When creating a web API, adding security is one of your main concerns. If you have more then one controller in the API or want a more detailed security model, you can use policies. Policies can be added to methods and define whether a user can access the method. If you are using Azure Active Directory for user authentication you can use groups and turn them into policies in your web API.
Authentication Flow
The flow for the authentication consists of a few steps, in general it will look something like this:
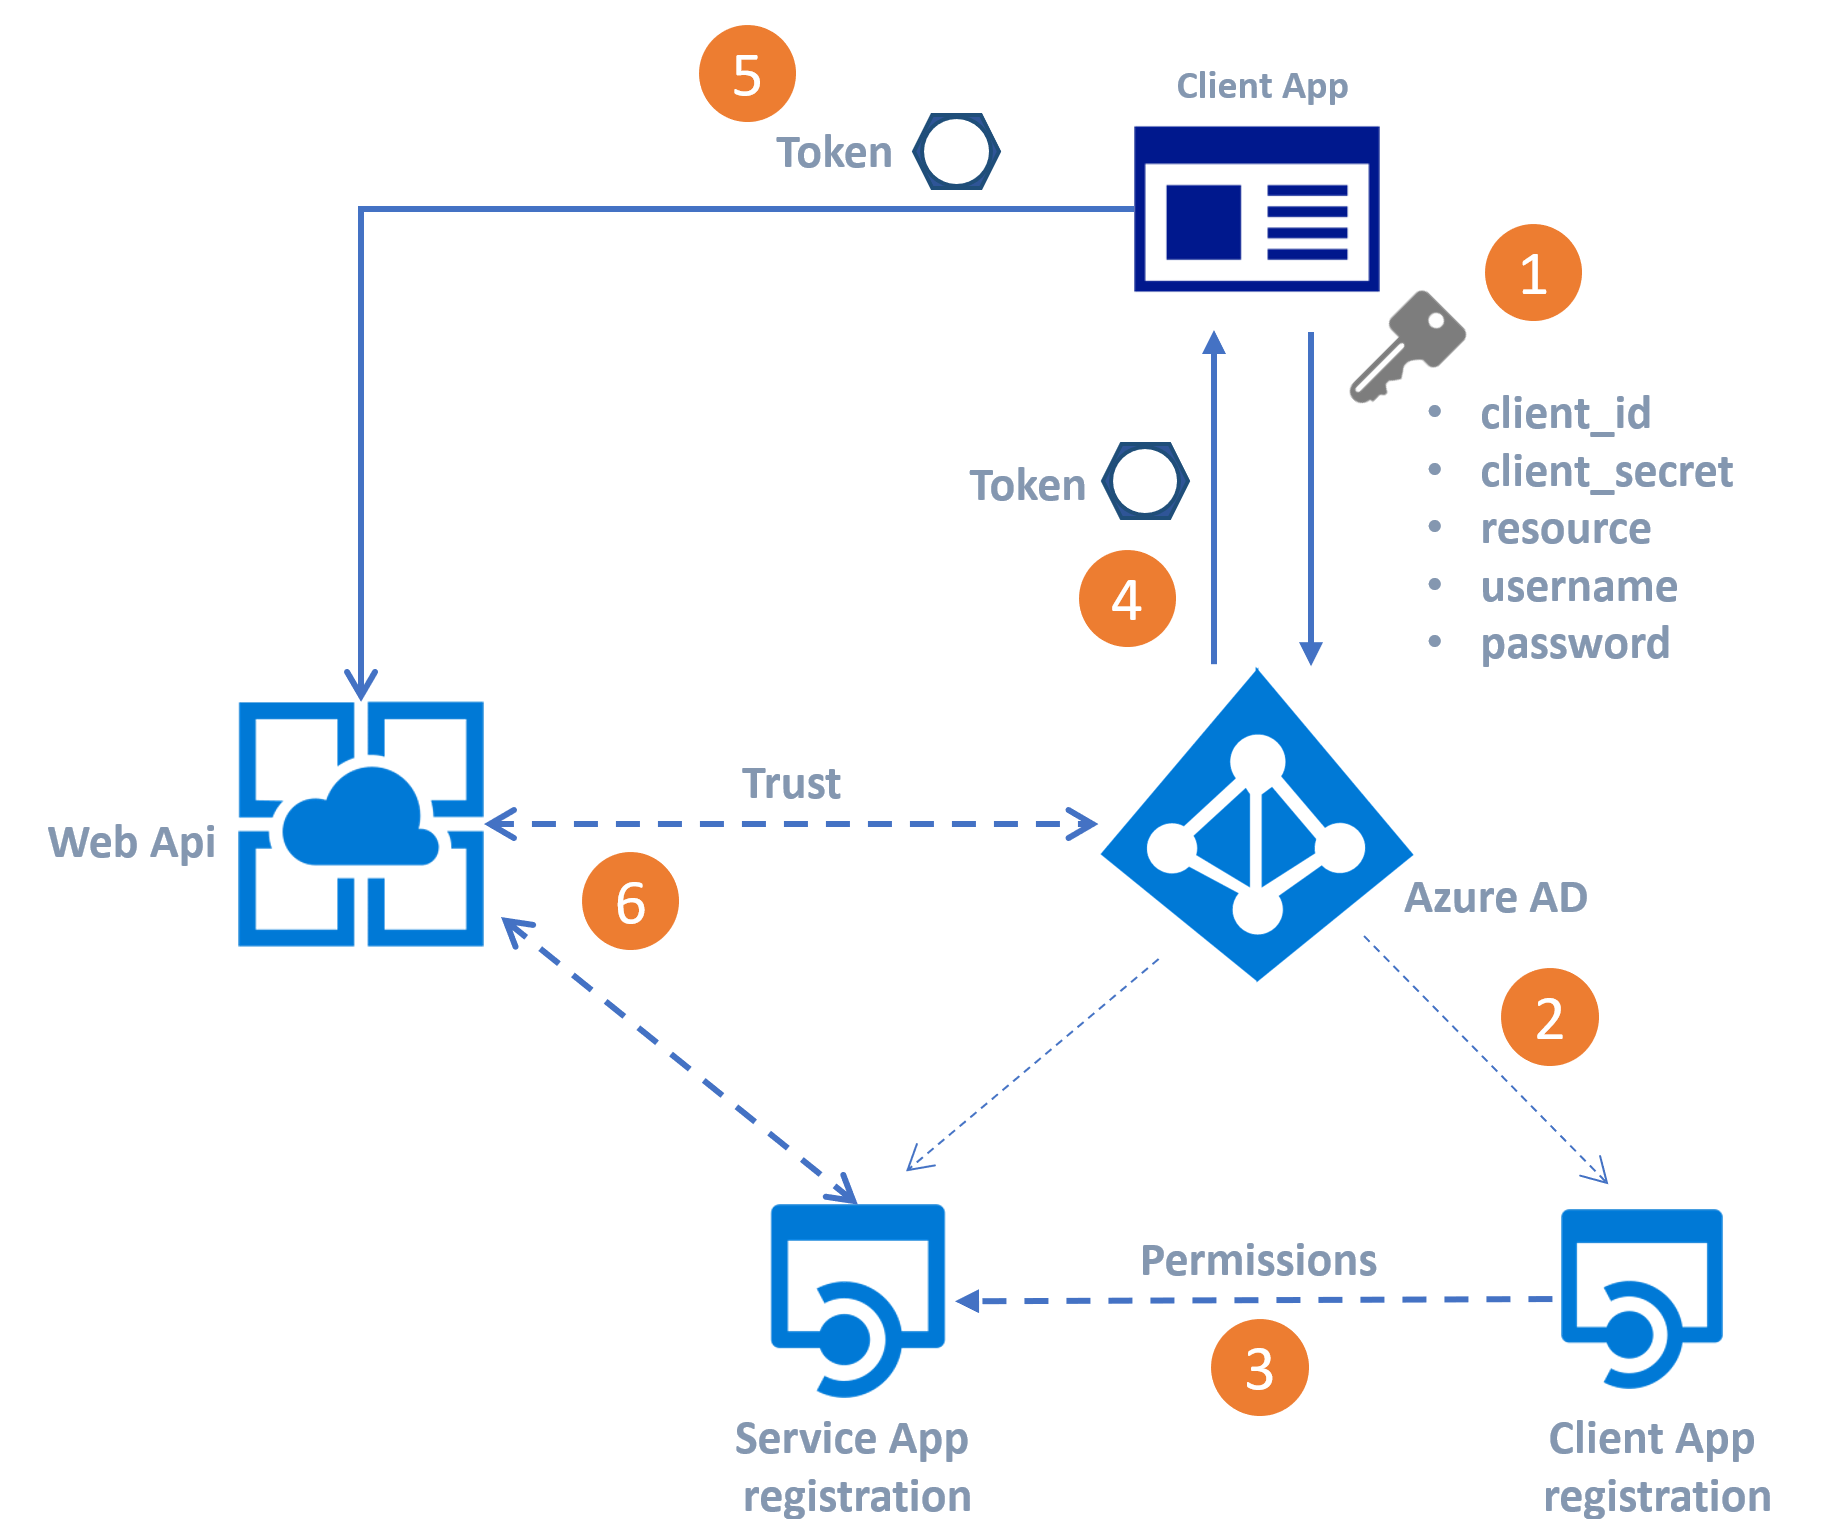
- Use the keys from the Client APP and the resource from the WebAPI to send a request for a token from Azure AD.
- Azure AD validates if the client App exists
- The permissions on the Web API for the client APP are verified
- Sending the Access Token back to the client application
- Use to Access Token to call the Web API.
- The web API validates the token against the Azure AD and pass on the request to the actual WebAPI controller.
For creating such an authentication flow, there are a few things we have to do.
Service App Registration
The first step is to create an App Registration in Azure Active Directory. This app registration is going to be the registration of the WebAPI. From the registration, we need the app ID URI, it is visible after saving the app registration. Later on, we are going to use this registration in our .NET core code, where it is called “Audience,” and we also need it to get a token, here it is called “Resource”.
Go to the Azure Active Directory and click on “App Registration”, select “New Application Registration”, Fill in a name, pick “Web API” as the application type and add some dummy URL to the “Sign-on URL” field. Click “Create” to register the WebApi as an app registration.
The next step is to make sure the app has the proper permissions to access the Azure AD groups later on. Here we need to change the manifest. Go to the App Registration; click on “Manifest”, click “Edit”. The manifest is a JSON settings file; we need to change the groupMembershipClaims, standard it has the null value. To read the groups from the user in the Azure Active Directory, change it to SecurityGroup. This setting makes sure the groups are available in the user token. Do not forget to upload the manifest after editing.
The last step is to set the required permissions for accessing the user information. Select the App registration, go to “Settings” and select the “Required Permissions”. Click “Add” and select “Windows Azure Active Directory” from the list. From the “Select Permission” page select “Sign in and read user profile”, click “Save”.
The Web API app registration is all done, so now we have to register the client application.
Client App Registration
The client app registration is the registration of the app we are going to use to call the Web API. So this can be a custom made website, or maybe it is just postman. Whatever you are going to use it has to be registered, and it has to have permissions on the Web API to get a token.
So first step is again to create an app registration but this time for the client app. After creating the app registration with the same steps as above, we need to make sure it has permissions to use the WebAPI. Select the Client App registration and click on “Required Permissions”, from the list of API’s select the registration of the WebAPI we just created in the previous steps. Click “Save” to set the required permissions. Next, you have to click on “Grant Permissions” because the WebAPI requires Administrator Permissions, the users can not access the Web API if you do not use the “Grant Permissions” option.
To identify the client app to get the token from the Azure AD, we have to add a key. Select the client App Registration and click on “Keys”. To add a key to the list, fill in a name, and click “Save”. We need the key value to get a token, later on, so make sure you copy the value because you can not get the value of the key after you close this page.
For getting the token to use the WebAPI, we need the “Application ID” and the value of the key you just created. The Application ID is called the “client_id”; the value of the key is called the “client_secret”.
Create AD groups
Because we are going to use policies based on Active Directory groups, you might need to create a new group for the new API. In the Azure Portal select Azure Active Directory and go to “Groups”, add a new group, make sure to select “Security” as “Group Type”. Next, add some members to the group and click “Create” to finish adding the new group. This group has an object id, which is a GUID, we need this GUID to create the policy later on in code.
Implement in Web API
Create, using Visual Studio 2019, a new “ASP.NET Core Web Application”, I’m using version 2.1, and pick “API” from the type of application, leave the Authentication box empty. This creates a Web application with just one controller, an “appsettings.Json” file, and some start-up classes.
Now we need to make the trust between the Web API and the Azure Active Directory. Therefore we need to adjust the “startup.cs” file. Add the following code to the public void ConfigureServices(IServiceCollection services) method:
services.AddAuthentication(JwtBearerDefaults.AuthenticationScheme)
	.AddJwtBearer(auth =>
	{
		auth.Audience = Configuration.GetValue<string>("Authentication:Audience");
		auth.Authority = Configuration.GetValue<string>("Authentication:Authority");
	});
To make the trust we have defined an Audience which is the App ID URI we defined in de “Service App Registration” and also an Authority this is the “TenantID” from the Azure AD, it looks something like https://login.microsoftonline.com/<DIRECTORY ID>. This will tell the Web Api his identity and where to verify the incoming tokens.
To make the authentication work correctly, you have to make another adjustment to the “startup.cs” file. Add the following line of code at the top of the method public void Configure(IApplicationBuilder app, IHostingEnvironment env):
app.UseAuthentication();
The next step is to add the Audience and the Authority to the settings file. Open the “appsettings.json” file and add the following lines.
 "Authentication": {
    "Audience": "<here goes the App ID URI>",
    "Authority": "https://login.microsoftonline.com/<DIRECTORY ID>"
  }
The last step is to implement the AD group as a policy. The token from Azure AD contains the groups assigned to the user. To create a policy based on the Azure AD groups, add the following code to public void ConfigureServices(IServiceCollection services) method in the “StartUp.cs”:
services.AddAuthorization(options =>
{
	options.AddPolicy("<policy name>",policyBuilder => policyBuilder.RequireClaim("groups", "<GUID of the AD Group>"));
});
So what does this code do, it creates a policy with the name you provided. When needed, it verifies that in the received token there is a “claim” called “groups”. In this “claim,” the GUID of the Azure AD has to be present. If so, the user is authorized to call the API, if not the access is denied.
To use the policy in your controller, add the following line of code on top of the controller method(s).
[Authorize(Policy = "<policy name>")]
You controller method should look something like this
[HttpGet("{id}")]
[Authorize(Policy = "policy name>")]
public ActionResult<string> Get(int id)
{
	return "value";
}
Postman
After doing all the plumbing, we are now ready to test the API. I’m using postman to get to the token and call the API. After installing postman, you can get the token from Azure AD and use it to call the API. Of course, you can get the token and copy the value into the request but there is a better way to use postman.
So after starting postman, you have to create a new environment and give it a cool name. Add a key to the environment and call it “bearerkey”.
Now within the environment create a new “request”, change the action to “post” and the URI to https://login.microsoftonline.com/<DIRECTORY ID>/oauth2/token. Navigate to the
“Headers” tab in the request and add a header using Key: Content-Type and Value: application/x-www-form-urlencoded.
Go to the body tab and add the following keys and values:
grant_type-passwordclient_secret- the client secret from the client applicationclient_id- the Application ID from the client applicationusername- the usernamepassword- the password for the userresource-app ID URIfrom the server application
The last step in getting the token is to store it in the variable “bearerkey” we created. The post returns a JSON with a field called “access_token”. To extract the token from the JSON we need to add some code to the “Tests” tab. Navigate to the “Tests” tab and add the following JSON code:
	var jsonData = JSON.parse(responseBody);
	postman.setEnvironmentVariable("bearerkey", jsonData.access_token);
This code stores the “access_token” value in the “bearerkey” variable; all other requests in the same environment use this variable.
Calling the API
The last thing we need to do is create a request for calling the API we just created. Add a new request in Postman. The URL should be the API URL, and the action should be the action of the API method you want to call. Navigate to the authentication tab and select “Bearer Token” from the “Type” list. Next, add the value “” in the “token” field. This stores the value of the bearerkey variable in the headers of the request. After getting the bearertoken from Azure AD, use the “Send” button in postman to successfull call the API.