If you have been working with GitHub for a while, you have probably seen the ‘old’ version of boards and issues. Last year, GitHub released an all-new version of Projects. This new version introduces more flexibility than before. As GitHub says, Built like a spreadsheet, project tables give you a live canvas to filter.
So, instead of having a board per repository, you can use projects to manage work items over different repositories and track them in one place.
New Project
In GitHub, you can navigate to your projects to view all the projects you have. Default it will only the open projects. You can create a new project using the New Project button.
Based on the template you selected, the first project board is created. In this case, I used the table template.
To add an item to the list, type whatever you want to add at the bottom of the list and hit Enter. As you will see, the item will appear as a draft. This item is in the draft because it is not an issue connected to a repository.
New Fields
If you create an issue, you will get a number of fields out of the box, like assignees. You can add more fields if you want. Navigate to your project. On the left side, click on the ... button and click Settings. On the right is a section called Custom Fields, where you can add new fields. You can add the name of the field and the type, like Date, Text, or Number.
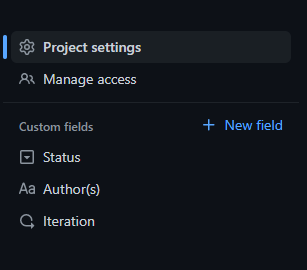
To support teams that work in sprints, there is also the option to add an Iteration. If you select this, you can define the start date of an iteration and the default duration. If you add the field, three iterations will be added to the list.
If you, for whatever reason, want to have iterations that differ in duration, you can click the iteration field you just added. The list with iterations will appear. Click on the More options button. Select the start date and the iteration duration you want to add.
To add an issue to an iteration, navigate to the project, open the issue, click on the iteration fields on the left, and select the iteration from the list.
Create an issue
To transform this draft into an issue, hover over the issue title, and a dropdown arrow will appear in front of the draft. Click on the arrow and select Convert to issue. You will be asked to choose a repository for this issue. Select one from the pop-up list, and the issue will be created and connected to the repository. The default status is now Todo.

Labels
You can add labels, with colors, to the issue. The labels are located in the repository connected to the issue. Navigate to your repository, then click on Issues. On the top, you will find a search bar. Next to the search bar is the number of labels. Click on the button to show all the labels. You can add or change the current labels by clicking the edit button. You can change the color and add a description. If you want to add an icon, use the colon and select the icon from the list.
To add a label to an issue, open the issue, click on Labels on the left, and select one or more labels from the list.
Milestones
You can add Milestones to your repository to keep track of your project. The milestones are also located in the repository connected to the issue. Navigate to your repository, then click on Issues. On the top, you will find a search bar. Next to the search bar is the number of milestones. Click the buttons to add a milestone. You can add a title and, optionally, a date. The list of milestones will show the number of issues connected and the percentage completed.
To add a milestone to an issue, open the issue and click on Milestone on the left, and select the milestone from the list.
Tasks in Issues
The description field of the issue supports markdown. So if an issue exists out of multiple tasks, you can use the [] to create tasks inside the issue. This will show all the tasks as checkboxes. You can check the boxes when you complete the tasks. The downside is that you cannot assign these tasks to anyone.
To assign the tasks to someone, open the issue in the repository it is connected to. Now hover over one of the tasks, and you will see a circle button on the left side of the text. If you hover over the button, it will say, Convert to issue. Click the button, and the task will become an issue. You can assign the issue to someone. The issue and the task are still connected; if you close the task, the issue is closed, and also the other way around.

Board views
Now that we have created issues, added fields, selected milestones, and added labels, we can create new views on the project board. Click on New view to get a table view with all the issues. If you want to change the view, click on the dropdown button. You can change the view to look like a Board or (if you have an iteration field) Roadmap.
The Board option will create a kanban board with a few columns. You can, of course, add more columns based on your needs. You can change the colors of the columns and select the fields you want to show on the board.

The Roadmap will create a timeline based on the iteration field and the iterations. You can add markers (the Milestones), filter the view and even change the view from Month to Quarter and Year. The view will show Today and the naming of the iterations.